You did everything right this week. You hit your calorie target every day. You walked. You slept. You drank water. You stepped on the scale Monday morning expecting a small win — and instead you were up 1.4 pounds.
Most people quit the diet right there. The scale was supposed to be the proof, and the proof said you went backwards.
The scale did not say you went backwards. The scale said you held more water this morning than five mornings ago. That is all a daily reading can say. It is not measuring fat. It is measuring fat plus food in your stomach plus retained sodium plus the glycogen in your muscles plus how well you slept plus where you are in your hormonal cycle. Five of those six change every day. Fat does not.
Photos taken in controlled conditions are not subject to most of that noise. Your fat-to-muscle ratio does not move in 24 hours. So a photo taken Monday morning in the same lighting as a photo taken three weeks earlier is showing you something the scale physically cannot.
This is the case for photos as the primary weight loss tracker, and the exact 7-step setup to take them in a way that captures real change.
Why the scale lies (and photos don't)
Daily weight is one of the noisiest signals in fitness. A normal adult body fluctuates 2 to 5 pounds in a 24-hour window from causes that have nothing to do with fat:
- Water — every gram of stored carbohydrate (glycogen) holds about 3 grams of water with it. A higher-carb day can put 2 pounds of water on the scale by morning, with no fat change at all.
- Sodium — restaurant food, soy sauce, deli meat, and most packaged snacks shift water out of cells and into the bloodstream. The scale registers it as 1 to 3 pounds for 24 to 48 hours.
- Food in your stomach and intestines — anything you ate that hasn't fully passed through is sitting on the scale with you. A high-fiber day can add a literal pound of "weight" until the next morning.
- Sleep and stress — poor sleep raises cortisol, and cortisol drives water retention. One bad night can be worth 2 pounds on the scale that has nothing to do with anything you ate.
- Hormones — a normal menstrual cycle moves water weight by 3 to 5 pounds across the month. Men are not immune either; testosterone fluctuations affect water retention too.
To actually lose 1 pound of fat, you need a deficit of roughly 3,500 calories — about a week of careful eating. So a daily reading is asking you to detect a signal that is moving by less than half a pound per day inside a noise band of 2 to 5 pounds. That is not a trackable signal day-over-day. It is a coin flip with a downward bias.
Photos, by contrast, do not measure water or food. They measure shape. And shape is governed by tissue, not glycogen storage. If you are 4 weeks into a real deficit, the photos are going to show it before any single morning's weigh-in tells the truth.
The setup: 7 steps for weight loss progress photos that actually compare
The whole game is consistency. The variables that aren't your body have to stop changing so the only thing different between Photo A and Photo B is your physique. These 7 steps cover every variable that matters.
Step 1. Same time of day — morning, post-bathroom, pre-meal
This is the single highest-leverage rule. Take photos first thing after waking up, after using the bathroom, and before you eat or drink anything. This is the "lowest noise" moment in your 24-hour cycle: minimal food in the gut, water rebalanced overnight, sodium from yesterday mostly processed, no glycogen spike from a recent meal.
If you take a photo Monday morning at 7 a.m. fasted, and another one three weeks later Sunday evening after dinner, you are not comparing your body. You are comparing two different physiological states.
Step 2. Same lighting — natural daylight, not overhead bathroom lights
Lighting is the single biggest reason "before" and "after" photos disagree with reality. Overhead bathroom lights cast hard downward shadows that exaggerate every line on your torso — they make a moderate physique look lean and a lean physique look shredded. The next day, soft cloudy daylight from a window will make the same body look softer.
Pick natural daylight from one specific window or a north-facing room and stand the same way every time. Soft, indirect daylight is the most consistent option. If your only choice is artificial light, pick a single fixture and never change it.
Step 3. Same outfit — minimal and form-fitting
Bulky clothes hide what you are trying to track. Wear the same minimal, form-fitting outfit every session.
- Women: sports bra plus bike shorts or briefs.
- Men: shorts or briefs.
If a sports bra-and-shorts setup is more skin than you want, you can stick with form-fitting athletic wear, but it has to be the same outfit photo to photo. A loose t-shirt covers a 5-pound fat change.
Step 4. Same poses — front, side, back
Take three relaxed shots every session:
- Front relaxed. Arms slightly out from your sides, shoulders neutral, stomach relaxed (not sucked in, not pushed out).
- Side relaxed. Profile shot. This is the most diagnostic angle for weight loss because it shows belly depth and posture together.
- Back relaxed. Arms slightly out, neutral posture. The lower back and hips are a frequent under-tracked area where weight loss shows up.
Optional: one front-flexed shot if you also want a muscle reference. But take all of the relaxed angles. You won't know which angle shows the change first, so capturing all three rules out the situation where you change but only your back shows it and you stopped taking back photos.
Step 5. Same background — plain wall, no clutter
A messy bathroom in one photo and a tidy bedroom in the next adds visual noise that makes side-by-side comparison harder. A plain wall — closet door, painted wall, blank section of bathroom — gives the eye nowhere to drift. Pick one wall and use it every time.
Step 6. Same distance and angle
The camera should be at chest height and roughly 6 feet away, pointed straight at you. Two camera mistakes show up constantly in weight loss photos and both are deceptive:
- Angled up from waist height. This stretches the legs, slims the waist, and broadens the shoulders. It will show fake "progress" between two identical bodies.
- Angled down from above eye level (selfie style with phone above your head). This shortens you, widens the midsection, and makes the same body look heavier.
Mark a spot on the floor where you stand. Place the phone at the same height every time — a shelf, a tripod, or a stack of books at chest level all work. The pose-matching ghost overlay in GainFrame handles this automatically — your last photo appears as a transparent guide over the live camera, so you line up exactly.
Step 7. Repeat every 2 to 4 weeks
Weekly photos show noise. Daily photos show nothing. Every 2 to 4 weeks is where you start to see signal above the daily fluctuation. The fat you lose in 14 days at a moderate deficit is enough to be visible if you set up the photos right.
If you have been on a longer-term plan, monthly is fine. The point isn't a strict cadence — the point is to space the photos far enough apart that the difference between them is bigger than the day-to-day noise. For more on cadence specifically, see how often you should take progress photos.
What weight loss actually looks like in photos (set your expectations)
Almost everyone quits during the flat patches. Nobody warns them that the flat patches are normal. Here is the realistic timeline:
- Week 1 to 2: usually no visible change in photos. The scale moved — that was water and glycogen — but the photos show roughly the same person. This is the most dangerous window because it feels like the diet isn't working when, in fact, it is doing exactly what it should.
- Week 3 to 4: subtle changes start. The face slims first for most people. The waistline starts to ease. Posture sometimes improves. None of it is dramatic, but a careful side-by-side will show it.
- Week 6 to 8: visible change in stubborn areas. Belly, hips, thighs, lower back. This is where the photos get fun, because you can finally see what the scale was hinting at.
- Month 3 to 4: dramatic before-and-after. The kind of comparison where someone who hasn't seen you in months actually notices.
The flat stretches in the middle of this timeline are normal. Do not quit during them.
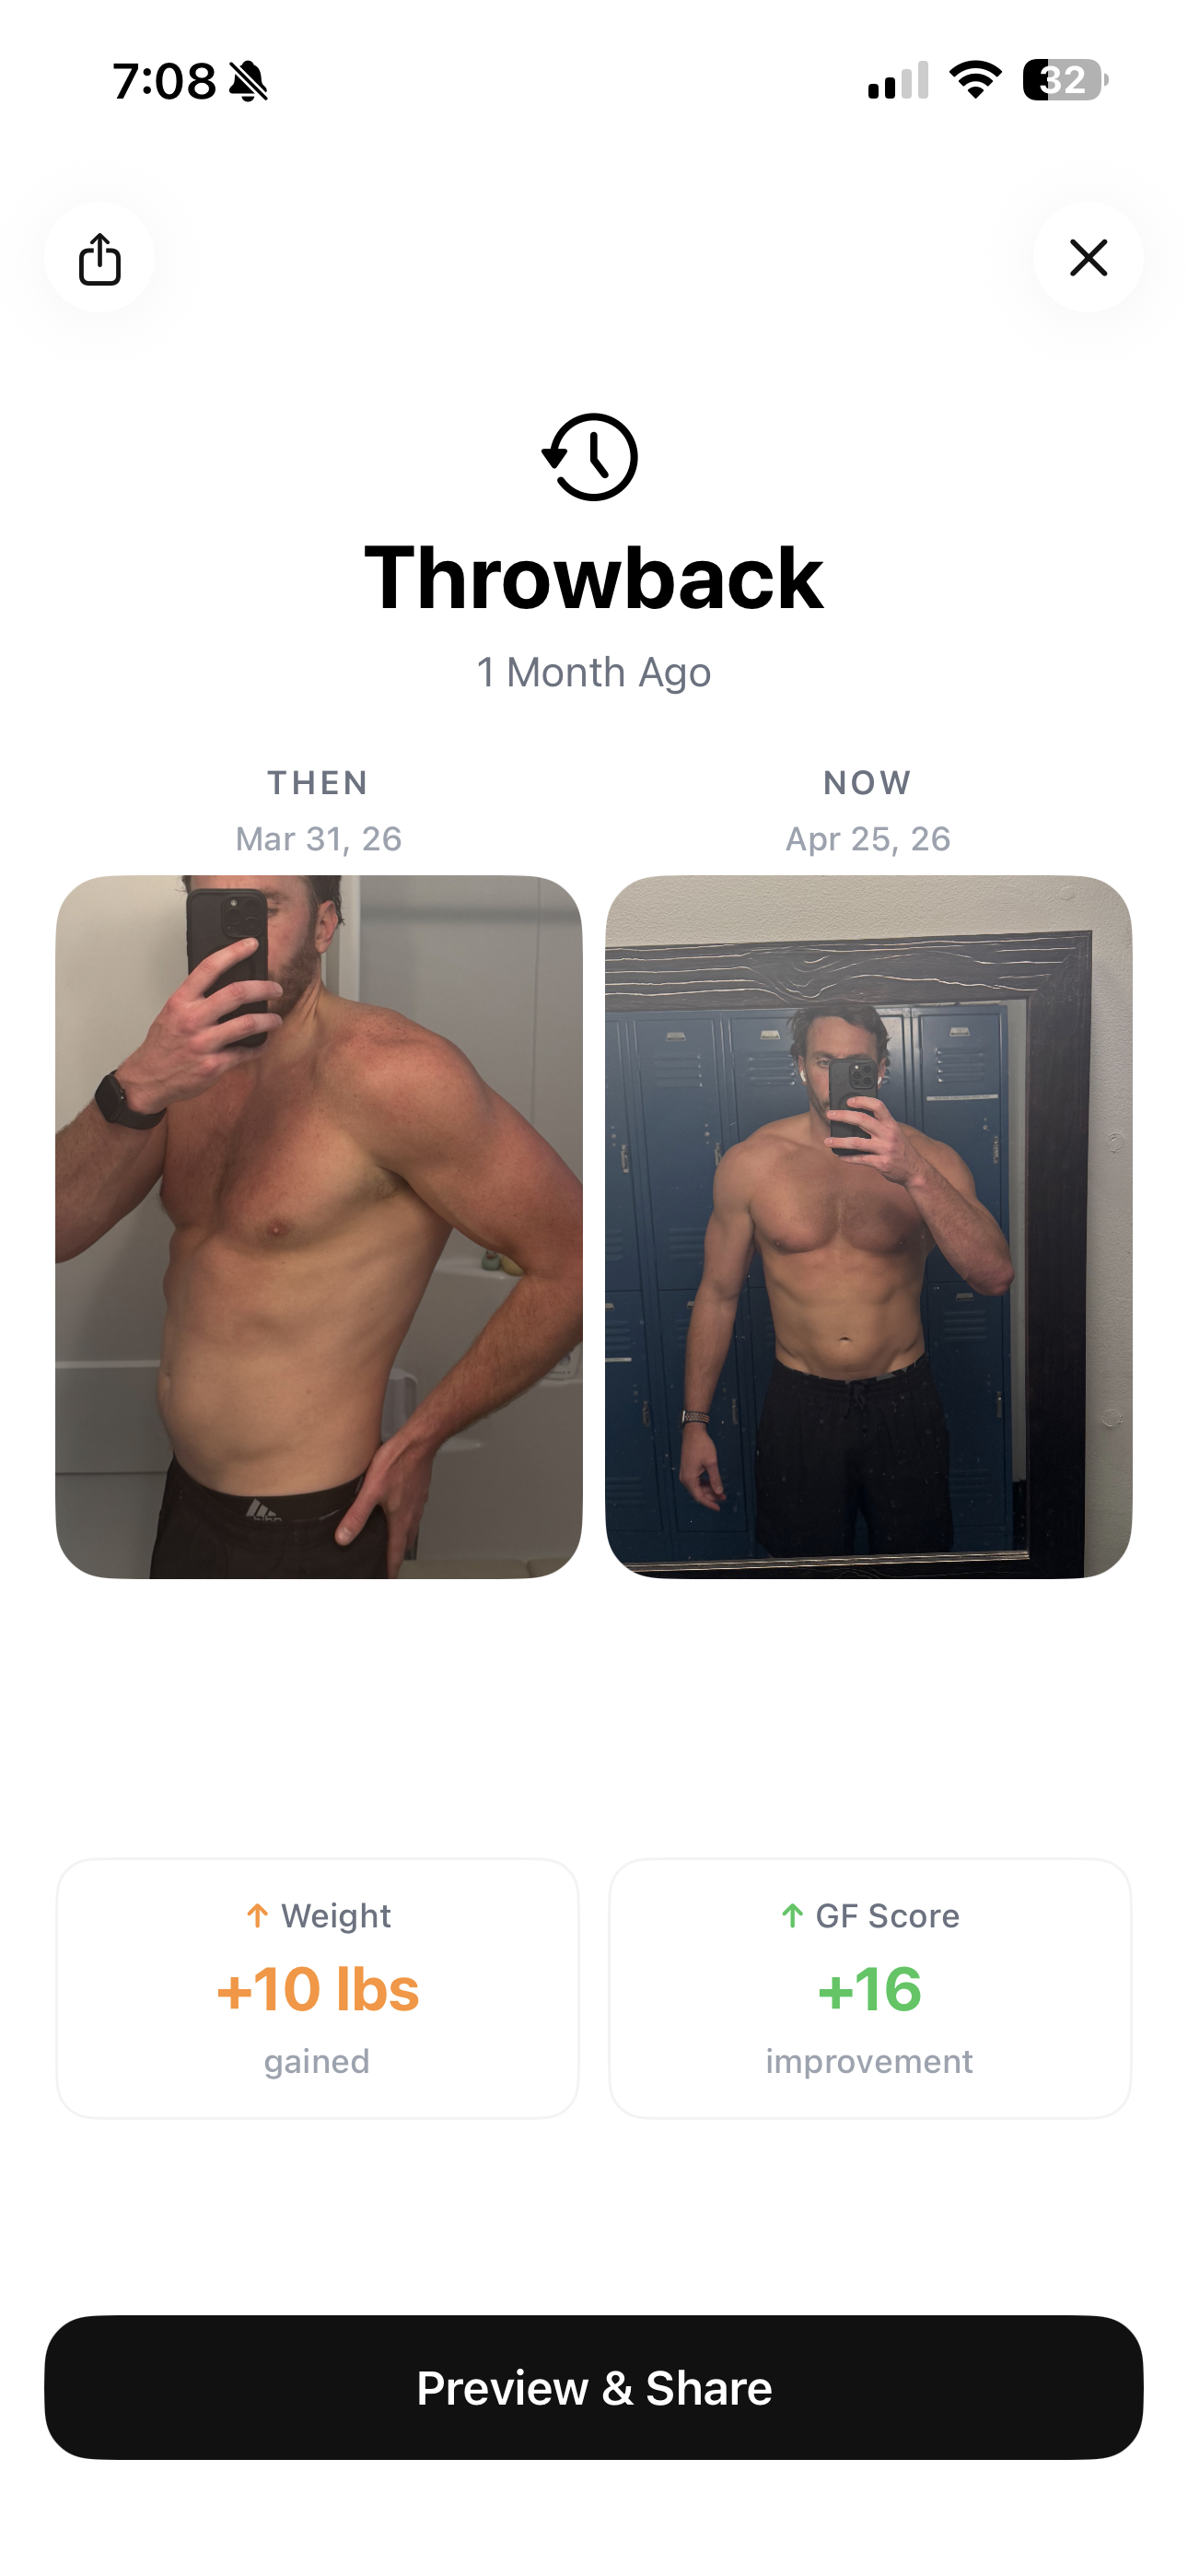
One small but powerful trick when the middle weeks feel flat: don't compare to last week. Compare to your starting photo. The 6-week delta is almost always more dramatic than the 1-week delta, because 6 weeks is past the noise window. Apps like GainFrame have a throwback feature specifically for this — surfacing the strongest comparison automatically so you see actual progress, not the daily flatline.
Use a weight trend tool, not a daily reading
If you are going to weigh yourself, do not look at single days. Look at the trend.
The math is simple: if you weigh in every morning, you will get a chart that bounces 2 to 5 pounds in either direction. Inside that chart, there is a slowly descending line that represents actual fat loss. The bounce is noise. The line is signal. A trend tool fits the line for you.
- MacroFactor — built around the trend weight concept. It actively recalibrates your calorie target based on what your weight trend is doing, not what any single day says.
- Apple Health — built-in weight tracking with a chart view that shows the moving average. Free, on every iPhone.
- MyFitnessPal — the longest-running food and weight tracker. Its weight chart shows your trend over weeks and months, which is the part that matters.
- GainFrame — pulls weight from Apple Health and overlays it on your photo timeline, so you see the body composition change and the weight trend in the same view.
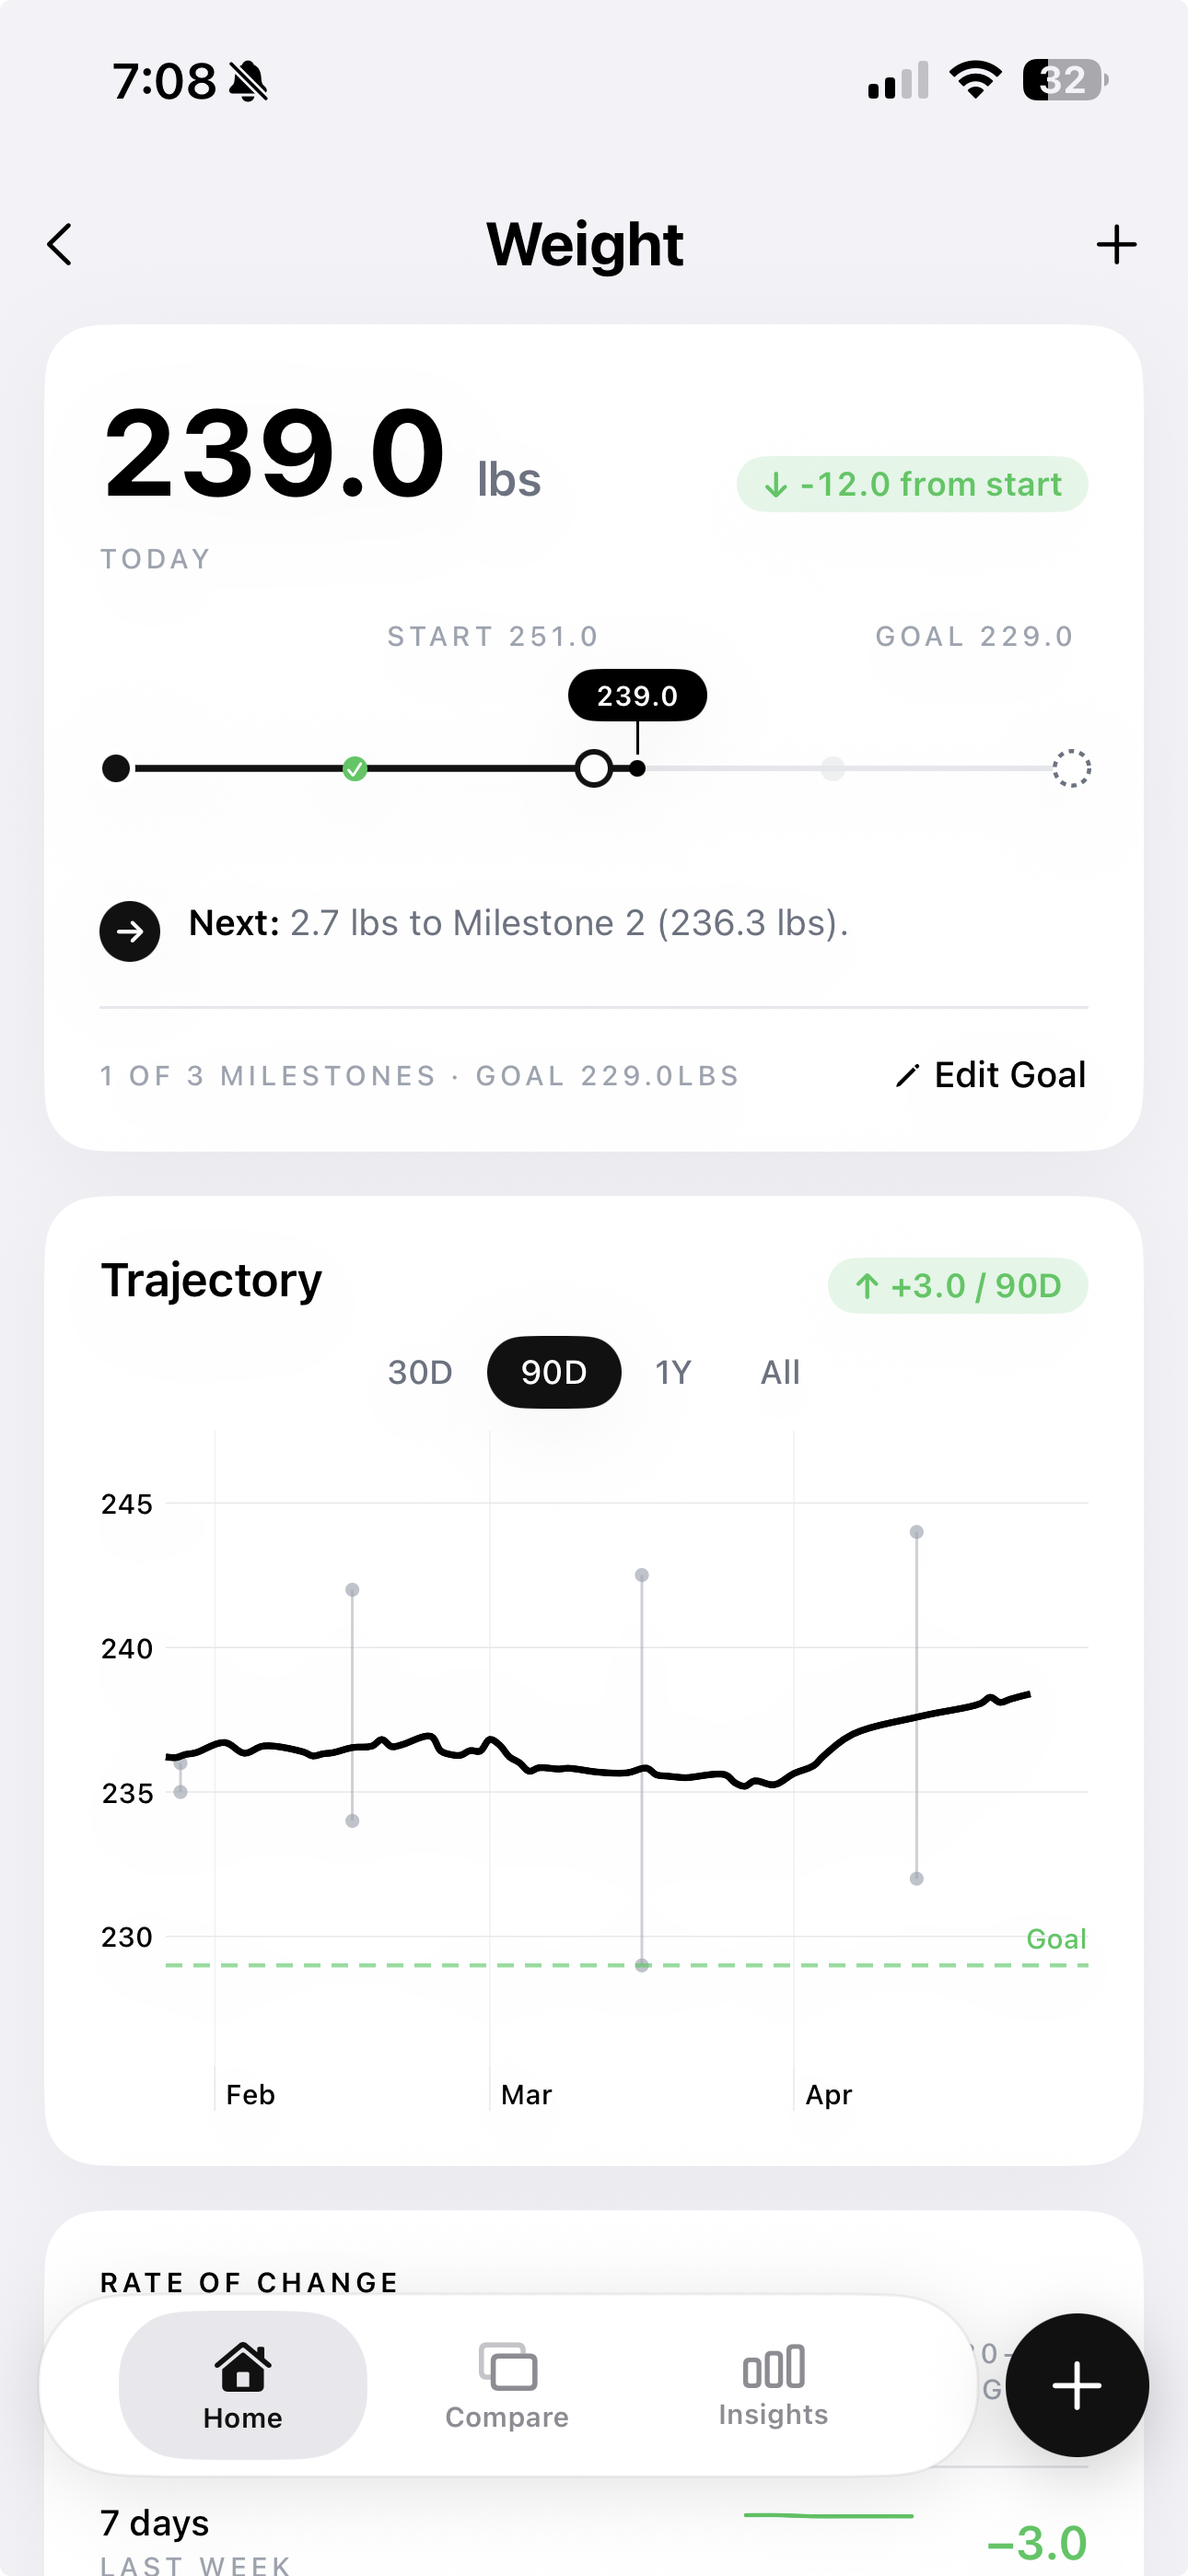
The trendline tells you the truth daily readings cannot. If the trend is going down, you are losing fat — even on the days the scale lies.
Where photos beat scales for weight loss
Photos catch progress that the scale physically cannot. The scale is one number. Your body changes in places that one number can't see:
- Visible fat redistribution. The face slims. The neck thins. The waist eases. None of this changes the number on the scale, but a Week 6 photo against Week 0 makes it obvious.
- Posture improvements. A 10-pound fat loss often comes with shoulders rolling back, the chin lifting, and the lower back unloading. The scale is silent on this. The side photo is not.
- Body recomposition. If you are walking and lifting at all, you are losing fat and gaining a small amount of muscle simultaneously. The scale shows this as "stalled." The photos show it as a leaner, denser physique. This is what people mean by "skinny fat to lean."
- Confidence in the slow weeks. When the scale stalls for 8 days, your confidence stalls with it. A photo timeline that shows steady change tells you the work is paying off — and that confidence is what gets you to the 12-week mark where everyone else quit at week 4.
Where photos lie too (and how to counter it)
Photos are not a perfect tracker. They have their own noise:
- Bloating. A high-sodium dinner the night before, the wrong time in your cycle, or a particularly fibrous meal can puff up the midsection in the photo even though you have lost fat that week.
- Lighting tricks. Even if you stick to natural daylight, a sunny day versus a cloudy day looks different. The morning sun changes angles by season.
- Posing tricks. Subtly pulling shoulders back, bracing the abs, shifting weight to one leg — your body wants to flatter you. None of this is dishonest. It is just inconsistent.
- Pre-meal versus post-meal stomach distension. The same person looks 3 pounds bigger right after a big meal.
The fix is simple: take 3 photos in 30 seconds, pick the most consistent one, not the most flattering one. Stand the same way you did last time. Don't suck in. Don't pose. The honest photo is the one that matches your last photo's pose and breath state — even if a different one made you look better.
The honest version of weight loss tracking
The scale and photos answer different questions. The scale tells you "how much do I weigh today" — which fluctuates with water, food, sodium, sleep, and hormones. Photos tell you "what does my body look like right now" — which fluctuates much less.
The strongest setup uses both, but with the noise filter on. A weight trend tool for the daily readings (so you stop reacting to single days), and consistent photos every 2 to 4 weeks (so you have visual proof when the scale lies).
This is the gap GainFrame was built to fill. The app ties your photos directly to AI body composition analysis — body fat percentage, lean mass trend, and a 12-group muscle breakdown — and overlays your weight trend from Apple Health on the same timeline. So you see both the visual change and the data confirming whether you lost fat or lost muscle. You don't need to guess whether the scale is telling the truth this week. You can see it.
Stop fighting the scale. Track what is actually changing.
GainFrame gives you AI body fat tracking, weight trend overlay, and pose-matching ghost camera in one place — so your weight loss tracking shows real fat change, not daily water-weight noise. Free to start.
Download GainFrame Free