The Ozempic transformation photo lie
Your photo from January and your photo from June both look amazing. The number on the scale dropped 30 pounds. So why does your bench press feel impossible? Why do your arms look slim but somehow lifeless? Why does the guy in the June photo look like a smaller version of the January guy instead of a leaner one?
Here's the data nobody puts on the carousel. Research on semaglutide (the drug in Ozempic and Wegovy) shows that without protective measures, roughly 60% of weight lost is fat and 39% is muscle. Tirzepatide (Mounjaro and Zepbound) is meaningfully better — closer to 75% fat and 25% muscle in clinical work — but most users on either drug are not tracking which side of that ratio they're on. They're tracking the scale.
The visual problem is worse than the numbers suggest. When 39% of your weight loss is muscle, the photos look better than they should. The visible fat is gone. The chest looks flatter, the arms look slimmer, the waist tapers. None of those changes tell you whether the slimmer arms are 90% fat reduction or 50% fat / 50% muscle reduction. The photo can't see underneath. You feel great about the photo and don't catch the body composition disaster underneath.
That's the gap this post fixes. Photos done right will catch most of what's actually happening — gross fat loss, gross muscle loss, posture changes, distribution changes. Photos paired with body composition tracking will catch the rest. The next eight minutes will save you the photo-looks-great, body-feels-broken outcome that defines a lot of GLP-1 transformations.
What "Ozempic face" really tells you about your transformation
"Ozempic face" — the gaunt, hollowed look you've seen in tabloids and TikTok — is widely talked about and rarely explained. It's not just "fat loss in the face." It's a visual signal of aggressive fat loss across the face and the structures underneath: subcutaneous fat in the cheeks and temples, plus the collagen and lean tissue that gives the face its volume. When the fat goes fast and the underlying tissue isn't being preserved, the face hollows. That hollowing isn't only aesthetic — it's a leading indicator.
The same dynamic happens at the shoulders, arms, and legs. Visible slimming is the sum of fat loss and muscle loss combined. The photo doesn't differentiate. If you see Ozempic face in your own progress photos, you've almost certainly been losing facial muscle alongside facial fat — and that pattern is repeating elsewhere in your body even if it shows up later.
This is why a single before-and-after collage is the wrong frame for a GLP-1 transformation. You need a photo protocol that lets you spot the loss-of-volume signal in time to do something about it.
The 7-step setup for honest GLP-1 progress photos
If you only do one thing from this article, do this. The setup matters more than the camera. The same body in different lighting can look 5% leaner or 5% softer with no actual change. To read trend instead of noise, every photo session needs to repeat the previous session.
- Same time of day. Morning, post-bathroom, pre-meal, pre-water. This is the lowest-noise moment in your daily weight cycle and the most repeatable lighting condition. Take the photo before anything else changes.
- Same lighting — natural daylight. Diffuse light from a window, ideally without direct sun. Avoid overhead bathroom lights — they cast harsh downward shadows that fake muscle definition and fake fullness in the chest and arms. Both effects hide the muscle loss you most need to see.
- Same outfit — minimal and form-fitting. Briefs or compression shorts. The point of the photo is to show your actual body, not a flattering silhouette. Bulky clothes hide both fat loss and muscle loss. If your motivation for taking the photo is "I want to feel good about it," you've already lost the data.
- Three angles plus one flexed. Front relaxed, side relaxed, back relaxed — every session. Then add one front flexed shot. The flexed photo is the GLP-1 specific addition. Relaxed photos show fat-loss progress beautifully and hide muscle loss. Flexed photos show whether you still have muscle volume underneath. You need both.
- Same plain background. A blank wall, ideally a neutral color. No clutter. Visual noise behind you makes month-over-month comparisons harder to read and makes small changes invisible at a glance.
- Same distance and camera angle. Camera straight-on at chest height, around 6 feet away. Mark the floor with tape so you stand in the exact same spot every time. Do not angle the phone up (slimming distortion) or down (widening distortion). On a tripod or propped on a shelf — never handheld.
- Every 2 to 4 weeks during dose escalation, then monthly. The first 3 to 6 months on a GLP-1 are the high-velocity window. Photos every 2 weeks during that period catch real change. Once your dose plateaus, monthly is enough to read the trend. Daily photos show only daily noise — see how often you should take progress photos for the full reasoning.
This setup is identical to the one in our weight-loss progress photo guide, with one addition: the flexed front shot. On a normal weight-loss journey, the flexed shot is optional. On a GLP-1, it's mandatory. It's the only photo angle that exposes muscle loss when fat loss is masking everything else.
What to look for IN your photos: the GLP-1 reading guide
The setup is half the work. The other half is reading the photo correctly. Most people look at their before-and-after and feel one of two things: pride or disappointment. Neither is data. Here's how to actually read each region of your body — what fat loss looks like, what muscle loss looks like, and what to watch for.
Face
Fat loss: jawline emerges, cheekbones become visible, the soft fullness under the chin recedes. Muscle loss: sunken or hollow look, "Ozempic face" gaunt appearance, temples appear concave. Watch for: rapid hollowing under the eyes, wasting at the temples, a face that looks "older" rather than "leaner."
Shoulders
Fat loss: traps emerge cleanly, the line from neck to shoulder sharpens. Muscle loss: shoulders look narrow with a "rounded" appearance, no cap on the deltoid, the shoulder-to-waist V tapers but in the wrong direction (waist holds, shoulders shrink). Watch for: the round shoulder shape disappearing — this is rear delt and lateral delt atrophy. Shoulders are one of the first places muscle loss becomes visible.
Chest
Fat loss: chest fat reduces, the lower pec line becomes visible, you no longer have to "tuck" anything. Muscle loss: chest looks flat or "saggy," upper chest disappears, collarbones become too prominent without the chest mass to balance them. Watch for: loss of upper-pec definition specifically — fat loss alone reveals the lower pec; both fat and muscle loss together leaves the upper chest looking deflated.
Arms
Fat loss: veins become visible, separation between bicep and tricep, more arm definition even when relaxed. Muscle loss: arms look stick-like, no tricep horseshoe, no bicep peak even when flexed, the arm appears narrower from every angle. Watch for: flat triceps when the arm is hanging, biceps that don't pop in the flexed front shot. Arms are the highest-signal region — if your relaxed photos show progress but your flexed photos show shrinkage, you have a muscle preservation problem.
Waist and abs
Fat loss: visible obliques, ab outline emerging, less softness around the belly button. This is the strongest fat-loss signal in the body and the one Ozempic delivers reliably. Muscle loss: abdominals look flat instead of contoured. Watch for: a midsection that's smaller but undefined — the visceral fat is gone, but the muscle underneath isn't picking up the slack.
Legs
Fat loss: quad sweep emerges, leaner overall shape but with maintained ham and glute fullness. Muscle loss: legs look "long and thin" instead of "thick and shaped," glutes flatten. Watch for: legs are the hardest area to read in photos because so much of the muscle is on the back of the leg. If your jeans are getting loose in the thigh AND the seat at the same rate, that's mostly fat. If the seat is loosening faster than the thigh, that's glute muscle loss.
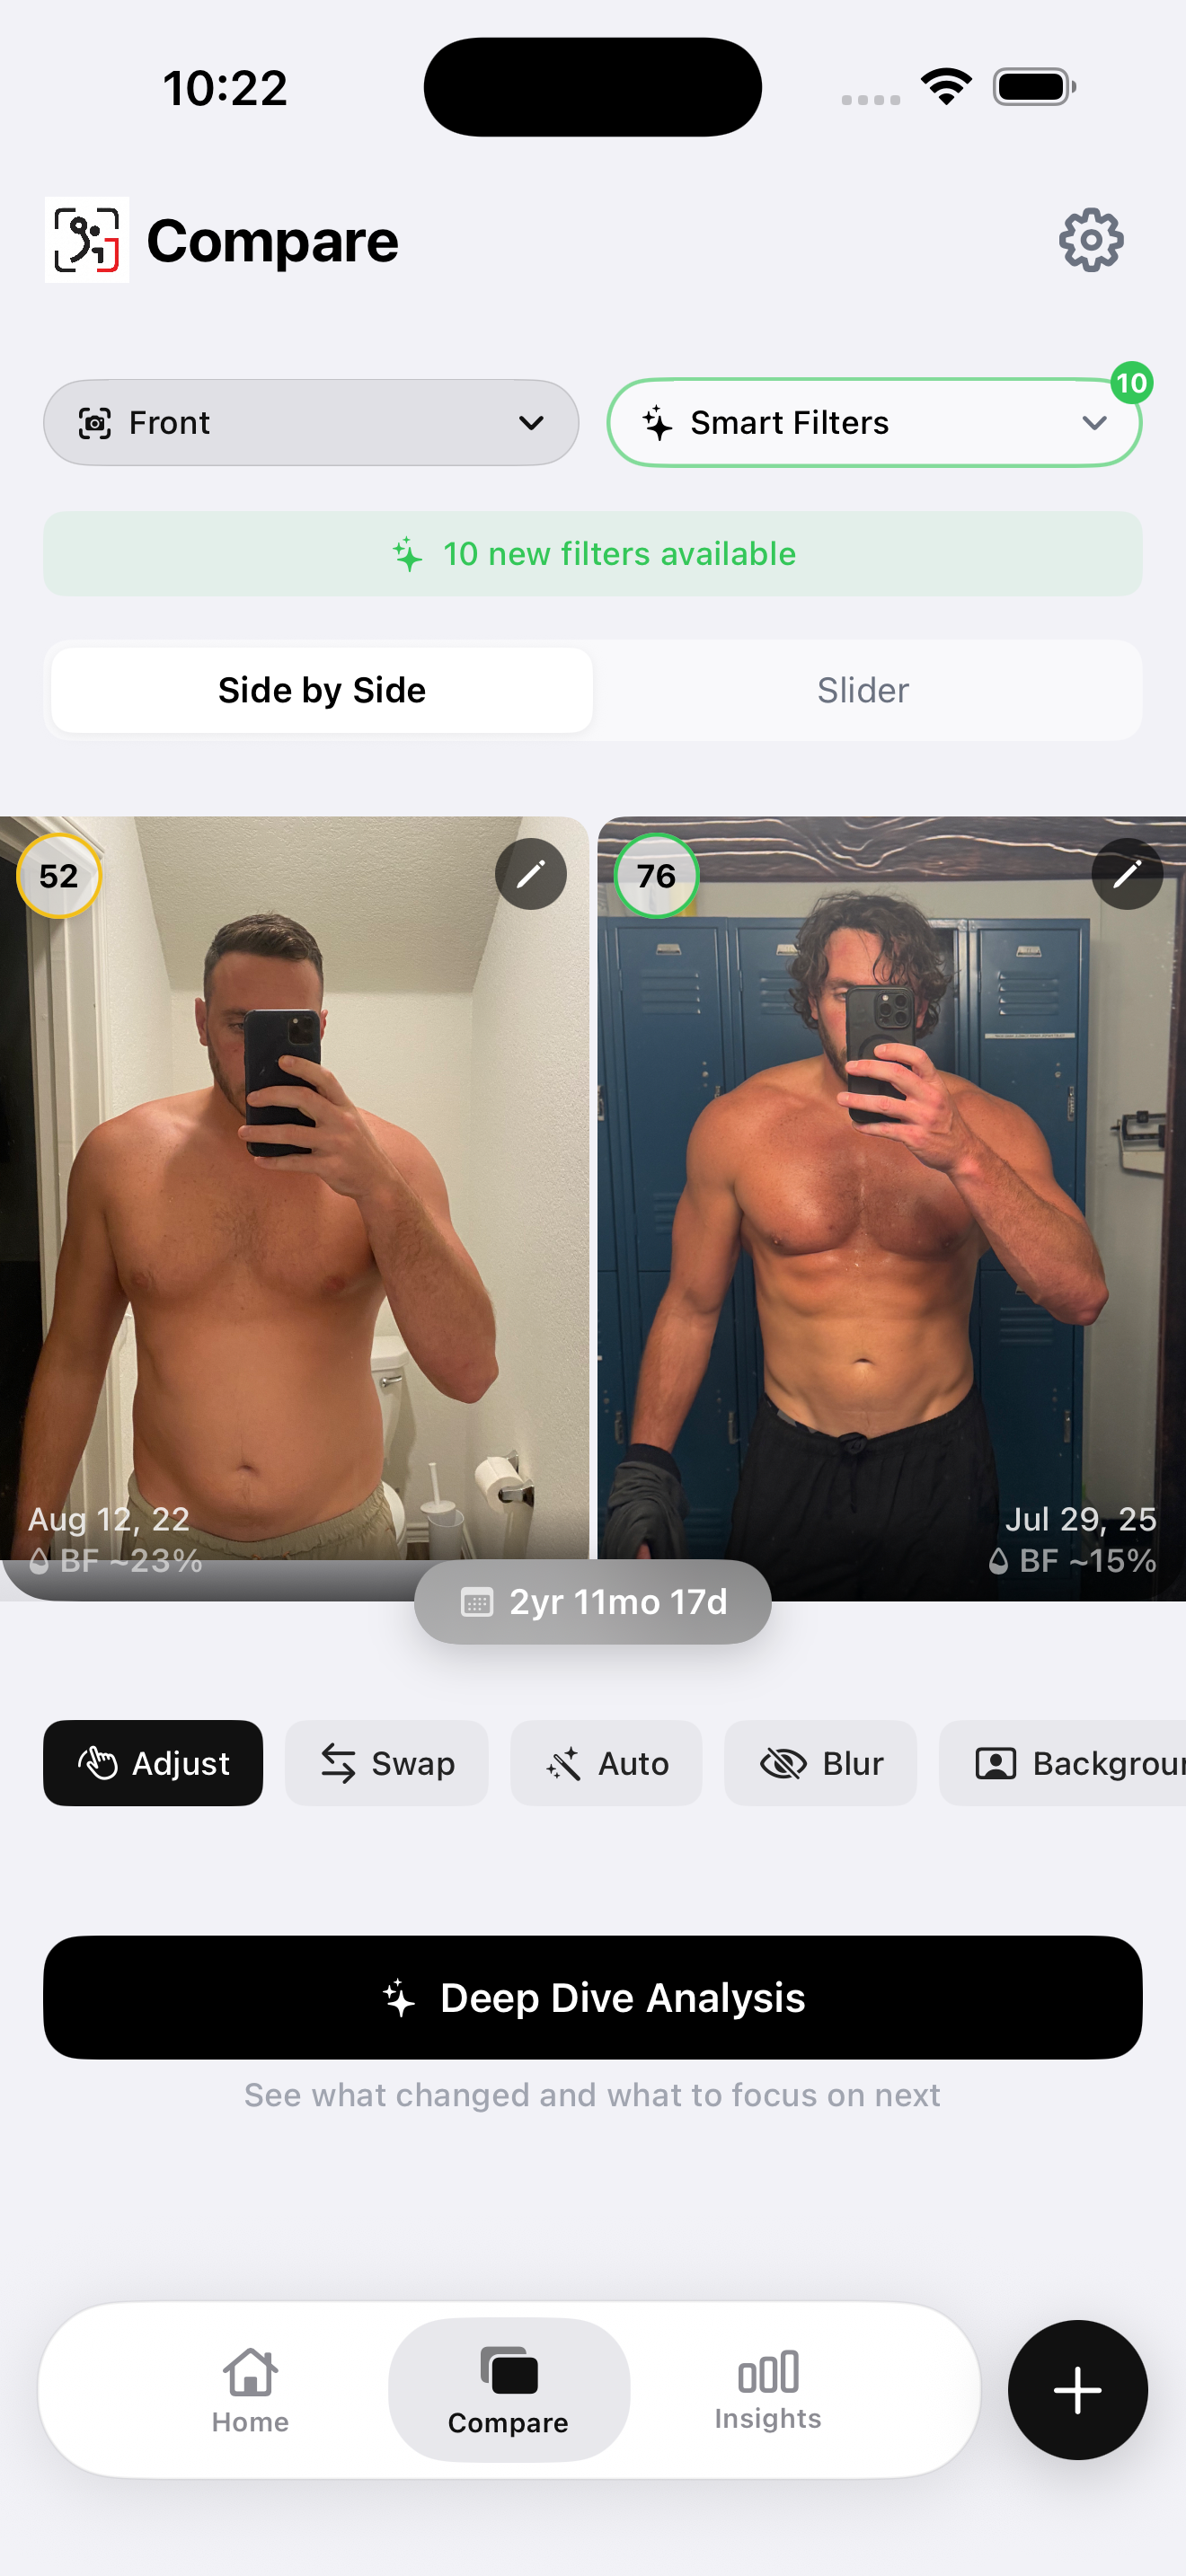
Photos alone aren't enough — pair with body composition
Photos done right will catch most of the gross changes. They miss the subtler ones. A 5–10% loss in lean mass can be invisible in a photo until it's cumulative — and by the time it's visible, you've already lost it. The honest answer is that photos are a necessary half of the picture, not the whole one. To track a GLP-1 transformation accurately, photos pair with body composition data.
The minimum tracking stack for someone on a GLP-1:
- Weekly or biweekly photos with the 7-step setup above — three angles plus flexed front. This catches gross changes in shape and tells you where to look for problems.
- Body composition tracking every 2 to 4 weeks. A quarterly DEXA scan is the gold standard, but $100–$200 per session limits how often most people do it. A home AI body scan from your photos closes the gap — see our best AI body composition apps comparison and our DEXA scan alternative guide for the options.
- Strength tracking via a workout logger. Strength preservation is the strongest functional indicator of muscle preservation. If your top sets on compound lifts are holding or rising, you're keeping muscle. If they're dropping despite consistent training, you're losing it. Hevy is the cleanest free option for this.
- Weight trend. Daily weigh-ins logged in Apple Health or a smart scale's app. Weight is the lowest-resolution data point but it tells you the overall direction of the curve.

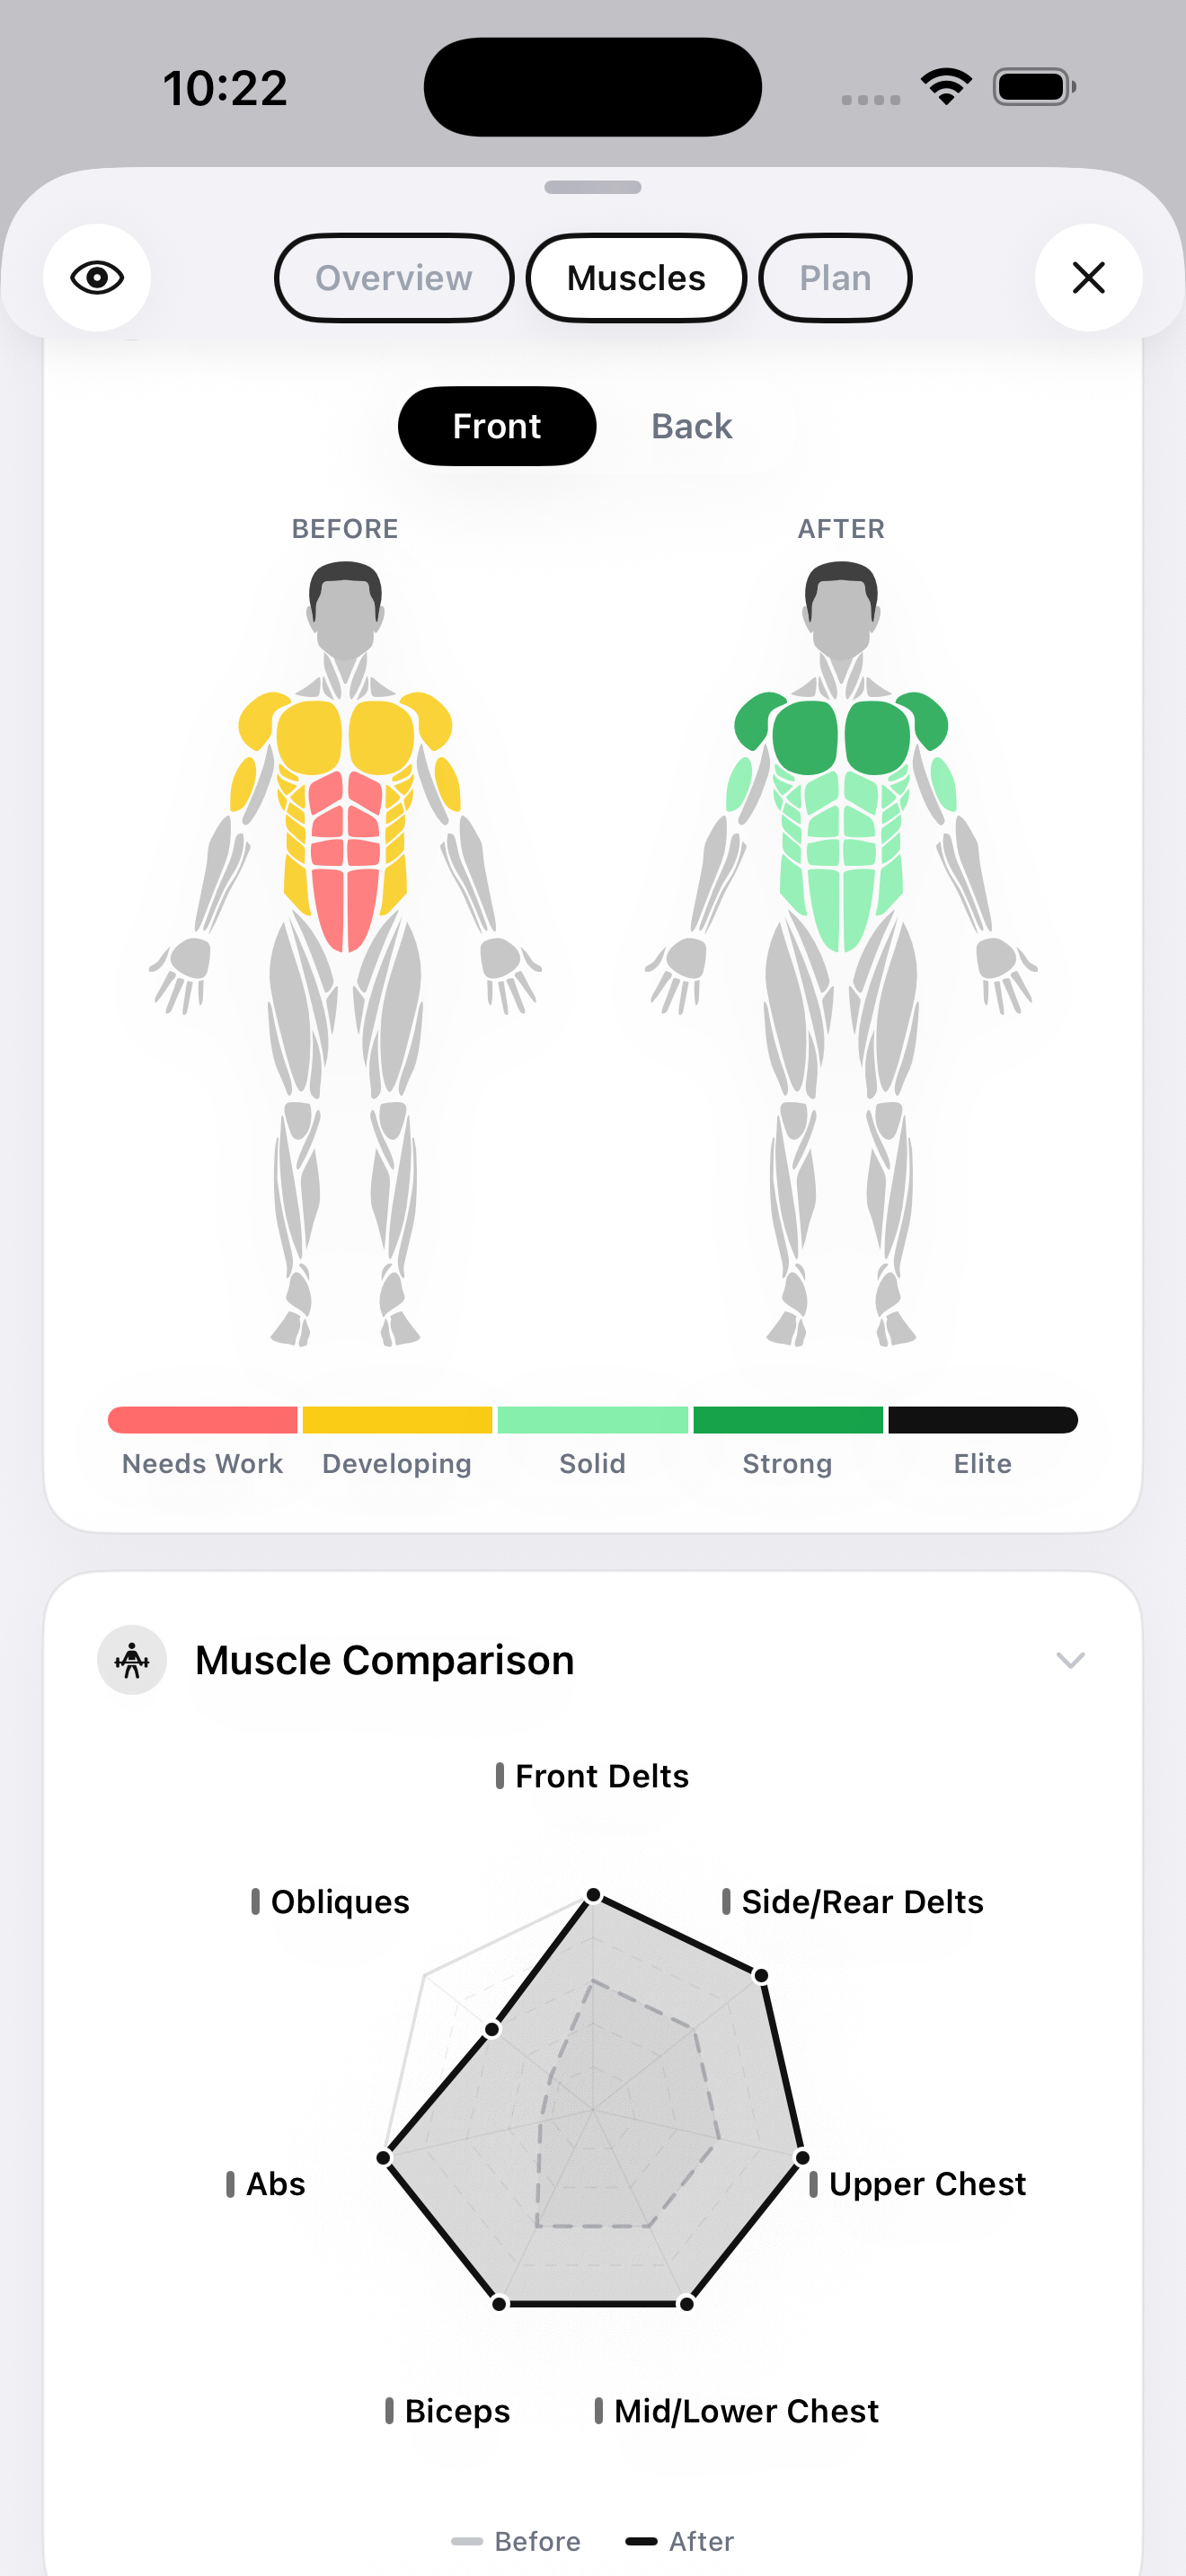
The combination is what makes the data legible. A photo showing slim arms plus an FFMI that's holding steady plus a bench press that's still hitting your old top set means the slim arms are real fat loss. The same photo plus a falling FFMI plus a bench press that's lost 20 pounds means the slim arms are partly muscle loss — and you have a problem that needs intervention. Same photo, two completely different stories. You can't tell them apart without the underlying data.
For a deeper look at the muscle preservation problem specifically, see GLP-1 muscle loss: how to track and prevent it — the pillar article on this topic.
The 4-pillar muscle preservation protocol
The photos are how you confirm the protocol is working. The protocol itself is a separate problem and a separate post (we cover it in depth in the pillar piece on GLP-1 muscle loss). The short version, for context:
- Resistance training, 3–4 sessions per week. Compound lifts with progressive overload. Squats, deadlifts, presses, rows, pulls. Mechanical tension is the signal that tells your body to keep muscle through severe caloric restriction.
- Protein at 1.6–2.2g per kg of body weight. The research-backed range from the International Society of Sports Nutrition. On a GLP-1, hitting this number is harder than usual because appetite is suppressed — you have to be deliberate.
- Sleep 7–9 hours. Recovery and hormone regulation. Under-slept lifters lose more muscle in any caloric deficit, and a GLP-1 is a deep deficit.
- Slow titration. Don't escalate the dose faster than necessary. The faster the weight comes off, the higher the muscle-loss percentage tends to be. This is a conversation to have with your prescriber, not a recommendation to ignore them.
This isn't medical advice — talk to your doctor about the medication itself. The tracking workflow above is for everyone who's already on a GLP-1 and wants to know what's actually changing.
The honest verdict
A 30-pound Ozempic transformation that's 75% fat / 25% muscle (achievable with the protocol above) looks better long-term than the same 30-pound drop at 60% fat / 39% muscle. At month 1, both look identical in photos — both are lighter, both are tighter, both flatter the carousel. At month 12, the gap is everywhere. The 75/25 transformation has visible muscle definition, holds strength, and doesn't bounce back the moment the medication stops. The 60/39 transformation has Ozempic face, weak compound lifts, and a metabolism running 200 calories below where it was before.
Photos alone can't tell you which one you got. Photos, plus body composition data, plus strength tracking can. That's the workflow this post exists to set up.
If you came to this article looking for inspiration photos to compare your transformation to — that's the wrong frame. Other men's before-and-afters can't tell you whether your transformation is healthy. Your own photos, taken correctly, alongside your own body composition data, can.
Track Your GLP-1 Transformation Honestly
GainFrame ties your progress photos to AI body composition — body fat %, lean mass, FFMI, and individual scores for 12 muscle groups. The honest version of GLP-1 transformation tracking. Pair it with Hevy for strength tracking and Apple Health for weight trend, and you have the full muscle-preservation stack at home.
Download GainFrame Free